Tuesday, January 6, 2015

How To Make a Vintage Ribbon Camera Strap


Supplies: 2 split metal rings, 2 large dog leashes (on clearance at Joann right now), thread, scissors, vintage ribbon, 1 1/2" cotton webbing, sewing machine

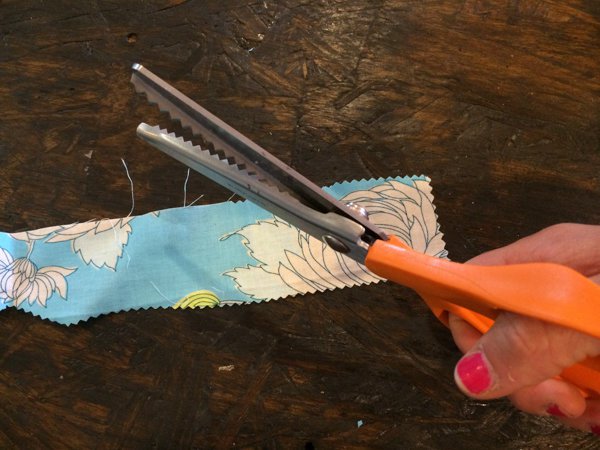
Step 1: Decide how long you want your strap to be and cut the ribbon that length. Cut the cotton webbing about 6" longer than the ribbon.
 
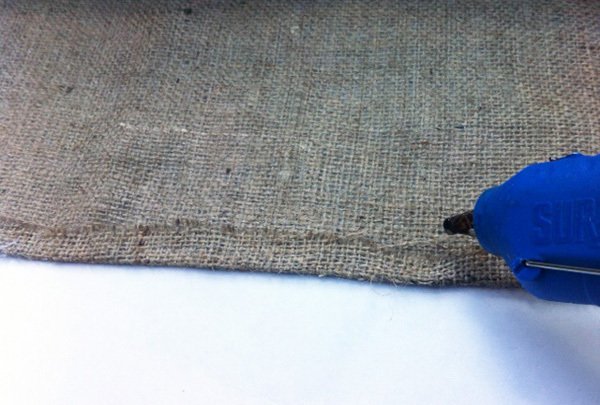
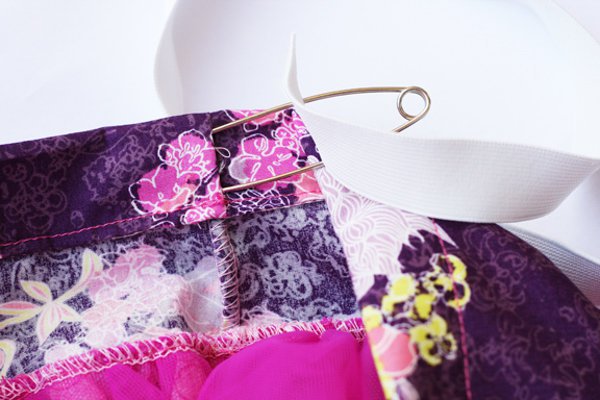
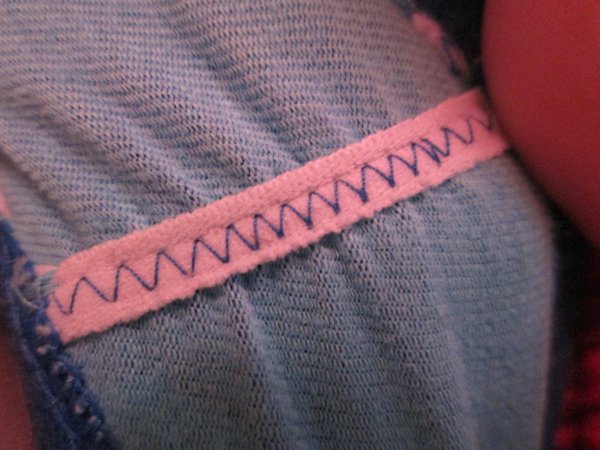
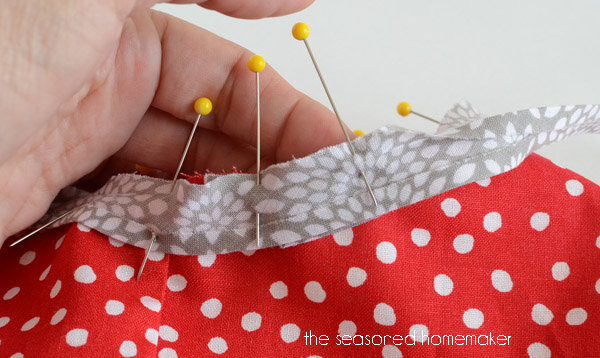
Step 2: Fold the edge of the ribbon over about 1/4" inch. 
 
Step 3: Place the ribbon on top of the cotton webbing about 2" from the end.
 
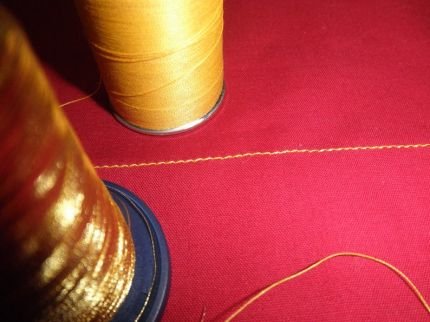
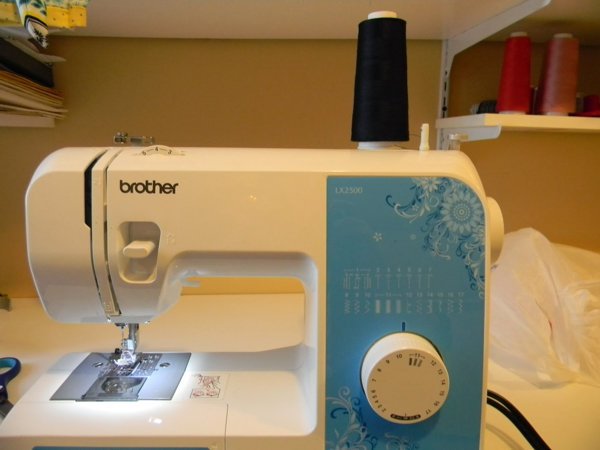
Step 4: With your machine, stitch down the side of the ribbon. Make sure you have a needle strong enough to go through all the layers. I got a needle that works for leather just in case.
 
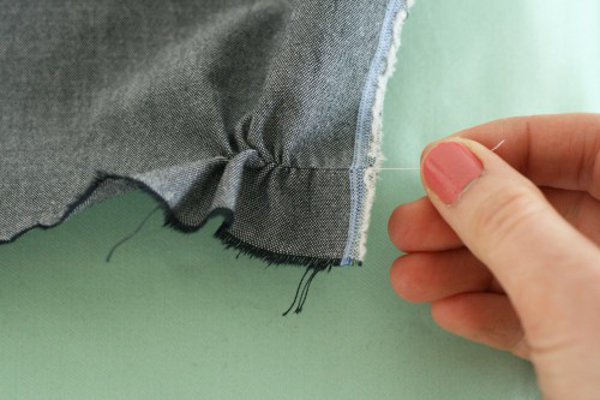
Step 5: Insert your dog leash at the end of the cotton webbing and stitch across the end. 
 
Step 6: Stitch many times over. I even stitched across into the end to really make sure.
 
Step 7: Repeat at the other side. The cotton webbing will overlap on the back about 2-3".
 
Step 8: The dog leashes were too large to enter through the space of my camera holder attachments so I added in the metal split rings.

DONE!
 

 Easy, right? And seriously, I'm stoked for my new camera strap. I'm even more stoked that I found a good use for my beautiful ribbon.

Animal Key Chain :: DIY

Animal Key Chain :: DIY


Last week, while I was working on the leather key holder, I had an aha-moment. On top of one of H's birthday presents, last summer, sat a cute 3D card stock bear head/tag. Because I thought it was so cute I rescued the little bear from the recycling bin and it'd been sitting on my desk ever since. Until last week, that is.

Animal Key Chain :: DIY

All of a sudden, I new what I wanted to do with it - make a replica in leather and use it to hang on a key chain. And that's exactly what I did. I tweaked the design here and there and even came up with a little fellow critter. So easy to make and according to my girls very cute.

Animal Key Chain :: DIY

Use sturdy leather for this project (I used low grade but rather stiff leather for mine). Besides leather, you will also need a (leather) needle and thread, an eyelet and eyelet setter, and a key ring. Skip the sewing and have your little ones decorate their bear or dog head with markers, if you like. Punch a couple of holes for the eyes. To keep everything together and give the head its 3D shape, slam an eyelet through the top as shown in the template, attach a king ring and you're done.

 Animal Key Chain :: DIY

Wouldn't these make cute party favors? Or how about making a whole bunch of them to decorate your Christmas tree. And if you're good at drawing (which I'm not), try making different animal heads.

25 Sewing Hacks You Won’t Want to Forget

This post is brought to you by: DIY Ready

25 Sewing Hacks - Must Know! Pin now, read later at diyready.com

After sewing for years I’ve naturally acquired a handful of tips and tricks. I’ve gathered together 25 of my favorites just for you. Read on for some of the best sewing hacks out there, and you’ll be master of the machine in no time. Don’t miss out on this awesome list of sewing hacks you’ll want to try at home. I’ve seen tons of sewing tips, but none that were as simple and as straightforward as this one. You’re going to be sewing like a pro after you’ve gotten to the last one! Don’t believe me? Make your way down my list and see what you think!

Best Sewing Hacks

1. How to strengthen your thread so it won’t break

Use this little gadget, it’s wax and you pull it through, the thread is coated in wax to be nice and strong while you hand sew

Best Sewing Hacks

2. How to get that needle through the hole (in a sanitary way)

Use hairspray. Spray the tip so it stays straight

How To Thread A Needle

3. How to sew over lumpy fabric

Next time you’re sewing over lumpy fabric like terry cloth or fleece, Use a plastic bag, place it over the fabric you are sewing and watch that presser foot glide!

Sewing Hacks | How To Sew Lumpy Fabric

4. How to sew in the easiest zipper

Sew up your seam as you normally would, place zipper face down over the seam allowance and sew it in place. Cut open the seam with your seam ripper to reveal the zipper underneath.

Sewing Hacks | How To Sew A Zipper

Be sure to check out our easy step-by-step tutorial on How To Sew A Zipper

5. How to use stay stitching to your advantage

stay stitching holds the shape of your material in place, as you ease it around curves. Stay stitch anything that isn’t cut on the grain or cross grain to prevent it from becoming disfigured. To stay stitch, stitch within the seam allowance, try 3/8″ if your seam allowance is 5/8″ and follow the curve of the piece. Stitch symmetrically, start your line on the outside and work your way in on both sides, if working on a center fold

sewing hacks-5

6. How to sew with decorative thread so it won’t break

Use two spools of thread, thread them through your machine and around your needle the same way you usually would, having both pieces of thread through the eye. Now when you sew with the delicate metallic thread, the regular thread will help support it.

sewing hacks

7. How to quickly mark your seam allowance

Rubber band 3 pencils together for 5/8″, or 2 pencils for 1/2″. Trace the edge of your pattern piece for a perfect seam allowance every time.

Sewing Hacks | Seams

8. How to always have sharp pins

Next time you make a pin cushion, use a steel wool as stuffing. This will keep your pins and needles extra sharp, as it sharpens them every time you poke them back in.  Stuff it even fuller with rice, which will help absorb any moisture.

sewing hacks

9. How to find your grain

Clip into your selvage just a tad, and pull on a loose thread. It will tug at your fabric and gather a little, gently pull it all the way out. The line this thread left behind is your cross-grain, perpendicular to your grain line. When you fold your fabric in half this line should match up on both sides.

sewing hacks-15

10. How to sew if you don’t own a sewing machine

A glue gun is messy and clunky way to sew. However, if you’re not interested in making anything fancy, perhaps just a new table runner for the next party, or a quick pant hem, break out the glue gun! Just keep the same rules of sewing in mind, and don’t forget your seam allowance.

sewing hacks-7

11. How to get that drawstring in

Need to pull all that cord or elastic through that waist band? pin the end with a safety pin and drag it through, bunching up the fabric as you go. This technique is technically done with a bodkin, but those aren’t just laying around the house by the dozens now are they?

sewing hacks-3

12. How to turn those thin projects

Turning a small bag, or in this case, a small tail? Use a straw and a chopstick or skewer, do as the pictures says and poke one side into the other.

sewing hacks-2

13. How to prevent your tights from running

Tights have a way of running away on us, if yours start to tear, stop it in its tracks by dabbing clear nail polish over the ripped area.

sewing hacks-16

14. How to keep your buttons on

Apply clear nail polish over the top of your buttons. It will help keep all the little threads in place. Too late? Learn how to sew on a button here.

Sewing Hacks | Buttons

15. How to quickly take in your clothes

Turn your clothes inside out and sew up the sides to make them fit better. If your clothes are made of a stretchy material, use the zig zag stitch on your machine.To truly get the perfect fit, where the clothes inside out, and pin in the sides. Mark your fabric where the pins are, remove them so you don’t stab yourself, then remove your clothes and sew up the sides. Do this for basic shirts, dresses, pants. You’ll find all your clothes are fitting much better in no time.

sewing hacks-19

16. How to quickly sew in elastic

In the need of a quick elastic stitch fix? Maybe want to attach elastic to something but don’t want to bother gathering it, or dragging it through the casing. Just stretch out your elastic over the area you want to cover, and sew it in place, holding the stretch elastic over the flat garment. The garment will pucker as you sew, but the elastic will remain taught as long as long as you hold it in place.

sewing hacks-4

17. How to keep your pattern pieces down

It is recommended to pin your pattern pieces in place over the fabric. But you can also use anything with a bit of weight to it. Examples include nuts and bolts, washers, spare change, and river rocks. Get creative, as long as your pattern pieces stay in place you won’t have anything to worry about.

sewing hacks-20

18. How to fake that hem

Use the same pattern piece that you used for the bottom of your garment to cut the hem, but just trace the bottom 2 inches. Cut out your fabric, pin it to the bottom of your garment (right sides together) stitch and turn. Bam! A perfectly fitted hem, no weird puckering or unforgiving stitches. Use this basic hem guide courtesy of oliverands and you’ll never hate that final step again.

sewinghacks

19. How to keep your pins and needles in order

Add magnets to a bowl to keep your pins in place. I love using these while sewing, tossing them into a bowl saves time as I remove pins as I sew.

sewing hacks-22

20. How to keep from fraying

Cut your fabric out with pinking sheers to keep it from fraying while you sew. This will also save a step when you’re finishing your garment (if you’re in a hurry).

sewing hacks-23

21. How to never lose your scissors

Grab a piece of ribbon long enough to wear as a very long necklace, loop your snips through out it, and tie it around your neck. Now you’ll like a true seamstress, and never lose your scissors again!

sewing hacks-24

22. How to keep your clothes from shrinking

Always pre-wash your fabric, checkout this link on craftsy for some tips on all the different kinds of textiles. Zig zag stitch your edges before washing if your fabric is prone to unraveling.

OLYMPUS DIGITAL CAMERA

23. How to know which side to sew

Did you know all fabric has a RIGHT and a WRONG side? This terminology might sound a bit odd while sewing, “Sew the wrong side? That can’t be right!” Just keep in mind, the right side is typically the side where the pattern is at it’s best, or the side you want people to see.  If your fabric is truly the same on both sides, like a muslin, just try to keep your sides consistent so you don’t get confused.

sewing hacks-25

24. How to never run out of thread

Use serger thread on your sewing machine. Ok so you’ll run out eventually, but it’s going to take a lot longer. If it doesn’t fit over your spool pin, invest in a spool stand.

*Editors Note: Some of you have mentioned in the comments that serger thread is not as strong, this is true, serger thread is thinner because it is meant to be used in tandem with 3-4 other threads. I advise you use this sewing hack on mock-up projects, practice pieces, and basting stitches only. -LL

sewing hacks-26

25. How to fake a hem

Maybe it’s just me, but I love bias tape. Use this to add a crisp even finish to any raw edge. It might take a while, but I prefer it over rolling under hems or fiddling with lining. Learn the technique here.

sewing hacks-6

Remember these 25 tips next time you’re sewing, or are in desperate need of a quick stitch fix!

Monday, September 29, 2014

Give Your Teen’s Room a Facelift with This Awesome DIY Loft Bed

This blog is brought to you by: DIY & Crafts

Give Your Teen’s Room a Facelift with This Awesome DIY Loft Bed Tutorial

This is a great little weekend project from Ana White Homemaker. A loft bed serves so many purposes. This one has a great little desk with many bookshelves so your teenager will actually have a place to put everything. It’s a relatively easy project if you know how to use essential tools and you can make the entire bed, ladder included, for less than $150. Now, that’s a great way to get a new look for your kids room without breaking the bank. If you have more than one teenager, do one for each of them and really help them to get their room organized.

Shopping List: 
15 – 1×3 Boards, 8′ Long
3 – 1×8 Boards, 10′ Long (cut one long and one short cut from each)
1 – 1×8 48″ Long (cut 1 short cut from this one)
3 – 1×4 Boards, 8′ Long
1 – 2×2 Board, 8′ Long
11 – 1×2 Boards (Less if you have a bunkie board or box spring), 8′ Long
1 1/4″ Screws
2″ Screws
Wood Glue


Finishing Supplies (Wood Filler, Sand Paper, Paint, Brushes, etc)
Tools: 
measuring tape
square
pencil
safety glasses
hearing protection
drill
circular saw
nailer
sander
level
 
General Instructions: 
On a large project such as this one, it is crucial that you build straight and square. To do this begin by working on a clean level surface. Select boards that are straight and free of cracks or other imperfections. Check for square after each step. Pre-drill and countersink all of your screw holes to avoid splitting the wood and to hide your screw heads. Use glue unless otherwise directed. Of course, you should be safe and have fun! Remember, you can click images for larger views. 

Dimensions: 


Fits standard Twin Mattress. Dimensions shown in diagram.
 
Cut List: 
 
Cut List for Loft Bed
8 – 1×3 @ 71″ (Inner Legs and Outer Legs)
4 – 1×8 @ 37 1/2″ (Large Planks, Ends)

2 – 1×4 @ 37 1/2″ (Top Planks)
3 – 1×8 @ 80″ (Front and Back Rails)
1 – 1×4 @ 80″ (Top Back Rail)
2 – 1×3 @ 46 1/2″ (Back Filler Piece, Long)
6 – 1×3 @ 2″ (Back Filler Piece, Short)
2 – 1×3 @ 56″ (Front Filler Pieces, Long)
2 – 1×3 @ 7 1/2″ (Front Filler Pieces, Short)
1 – 1×2 @ 80″ (Back, Top Piece)
2 – 1×3 @ 40 1/2″ (End, Top Pieces)
2 – 1×2 @ 75″ (Cleats)
1 – 2×2 @ 76 3/4″ (Center Support)
14 – 1×2 @ 39″ (Slats)


Cut List for Guard Rail
1 – 1×4 @ 61” (Rail)
1 – 1×2 @ 61” (Top)
3 – 1×4 @ 15” (Uprights)
6 – 1×4 @ 2” (Filler Pieces)


Ladder Cut List
2 – 1×3 @ 65 3/4″ Overall (Bottom end cut at 15 degrees off square, top at 75 degrees off square)
10 – 1×3 @ 10 3/8″ (Spacers, ends cut parallel at 15 degrees off square)
5 – 1×3 @ 12 1/2″ (Treads)
2 – 1×3 @ 10″ (Top Spacer, cut to match top sides)


Cutting Instructions: 
Converting to Full Size
 This bed can easily be converted to full size. You will simply need to add 15″ to all boards that run parallel to the ends. This includes the planks, end top pieces and the slats. Shopping list will need to be adjusted as well.


Step 1: 
 
UPDATE: If you have narrow door opening (or are building the bed in a full size) you may need to assemble the bed in the room or not use glue so that the bed can be assembled and disassembled. The boards shown above in pink are not to be glued to the bed, and will be inserted in the slots on assembly. You will then on assembly use screws to fasten the rails to the bed ends.


Step 2 Instructions: 
Ends
Begin building the ends by screwing with 2″ screws and glue the planks to the inside legs. Center the planks on the inside legs, leaving 7/8″ on either side of the planks. Use the measurements above to guide you. Glue these pieces.


Step 3 Instructions: 
Front and Back Rails
 

Instead of fastening the front and back rails, mark their positions on the ends, as shown above. You can use one or two screws to fasten each board in place temporarily.


Step 4 Instructions: 
Back Filler Pieces
 

Measure and cut your filler pieces to fit the back as shown above. You can save yourself quite a bit of time by gluing and clamping these pieces in place. When you fasten the outer leg on, it will secure these pieces with screws. If your nailer is handy, a few 1 1/4″ nails would hold everything in place. You can use glue in this step. The filler pieces will hold your rail boards (the one’s you did not glue down in step 2) in place for now.


Step 5 Instructions: 
Front Filler Pieces
 

Add your front filler pieces just like you did your back filler pieces. Glue and screw.


Step 6 Instructions: 
Outer Legs Pieces 

First unscrew the rail boards that you loosely screwed in step 2, and remove. Then, using 2″ screws and glue, pre-drill and countersink your screws as you fasten the outer leg boards to the inner leg boards. If you are staining or leaving natural, I highly recommend using a measured bolt pattern or screwing from the inside of the legs on this step.


Step 7 Instructions: 
 
DO NOT FASTEN in the gaps left for the rail boards. Test fit your rail boards to make sure they fit in the opening. The diagram above shows how the rail boards should be removable.


Step 8 Instructions: 
Back, Top 

Using 2″ screws, fasten the back top piece to the tops of the legs. The back top piece will be flush with the outside of the legs, but not the inside. Do not use glue. This board will be removed to move the bed through a doorway.


Step 9 Instructions: 
Top, Ends

Using 2″ screws and glue, fasten the top end piece to the top of the ends, as shown above.


Step 10 Instructions: 
Cleats

On assembly, fasten your side cleats to the side rails, flush with the bottom edge. Use 1 1/4″ screws. Then fasten your center cleat to the end planks, flush with the bottom of the 1×8 plank, using 2″ screws and NO glue. Center the support on the plank.


Step 11: 
Slats
 

Position your slats with approximately 4″ gap between the slats. TIP: Cut 2 1×2 scraps at 4″ and uses as a spacer between the slats as you are assembling. Screw the slats down with 1 1/4″ screws. For extra support, you can also screw a couple of the center slats from the outsides of the 1×8 rails using 2″ screws.


Step 12: 
Guardrail
 

Use 1 1/4″ fasteners (nails would work just fine) to build your guardrail. Fasten from the inside to hide holes. Then add the 1×2 top, keeping all outside edges flush.

 
Step 13: 
Guardrail Attachment
 

Attach the guardrail to the bed as shown above. From the inside, use 1 1/4″ screws. Don’t use glue so you can remove it.

 
Step 14: 
Ladder 

So cutting the top of the sides is going to be a little tricky. Think of it this way, you are leaving a 15 degree angle on the top of the board, then trimming off the top 2 1/4″ to remove the sharp pointy end. The best way to do this is FIRST cut your top angle at 75 degrees off square (leaving 15 degrees on the board). You will need to use a jigsaw or circular saw. Then snip off the top 2 1/4″ at a right angle (90 degrees) from the back of the top (where the leg rests against the bed. THEN measure down the leg 65 3/4″ and cut your 15 degree angle on the bottom of the leg. Then use the top as a pattern when cutting the top filler pieces. Construct your ladder as shown above, using 1 1/4″ screws when joining the filler pieces to the leg sides, and 2″ screws to join the treads to the leg sides. Don’t forget your glue. See an exploded view below.


Step 15: 
Assembly
 

The boards shown in pink above are removable and are not glued down. You should be able to slide the boards out of the notches to disassemble the bed and move. Slide the boards back into the notches to assemble and use 2″ screws to screw from the outside of the leg into the rail boards. Also screw the back top to the top as show above. In this method, you should be able to easily assemble and disassemble the bed without destroying the finish.

Project Type: 
Beds
Estimated Cost: 
$100-$150
Room: 
Bedroom
Collections: 
Loft Bed
Skill Level: 
Intermediate
Style: 
Children's

Sunday, September 14, 2014

Homemade Burger King French Toast Sticks

This blog is brought to you by: BuzzFeed


Homemade Burger King French Toast Sticks
Vanilla French Toast Dunkers
Ready in 20 minutes

These are a healthy take on Burger King’s French Toast Sticks which are 584 calories/32 grams of fat for the same size.
Approximate Nutritional Information: 175 calories/1 gram of fat per serving

Ingredients


2 slices light whole wheat bread


½ cup Egg Beaters


2 tablespoons granulated Splenda


1 teaspoon fat-free French Vanilla coffee creamer powder


½ teaspoon cinnamon


½ teaspoon vanilla extract


¼ teaspoon butter extract


Pinch of salt


Nonstick cooking spray


Sugar-free maple syrup (optional)


Original recipe makes 1 Servings


Preparation

1. Toast the bread until golden brown in a toaster.
2. Cut each bread slice into four even strips.
3. Combine the Egg Beaters, coffee creamer, cinnamon, vanilla extract, butter extract, and salt in a shallow bowl or pie pan.
4. Whisk the mixture well until everything is dissolved and combined.
5. Soak bread slices in the egg mixture for 15 seconds on each side.
6. Heat a large sauté pan over medium-high heat and spray with nonstick cooking spray.
7. Place soaked bread slices in the pan and cook for 3-5 minutes on each side or until golden brown.
8. Serve hot and dunk into sugar-free maple syrup if desired.