
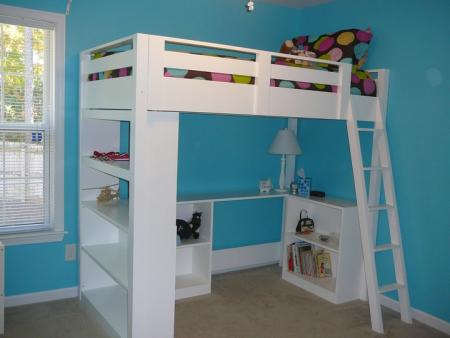
This is a great little weekend project from Ana White Homemaker. A loft bed serves so many purposes. This one has a great little desk with many bookshelves so your teenager will actually have a place to put everything. It’s a relatively easy project if you know how to use essential tools and you can make the entire bed, ladder included, for less than $150. Now, that’s a great way to get a new look for your kids room without breaking the bank. If you have more than one teenager, do one for each of them and really help them to get their room organized.
Shopping List:
15 – 1×3 Boards, 8′ Long
3 – 1×8 Boards, 10′ Long (cut one long and one short cut from each)
1 – 1×8 48″ Long (cut 1 short cut from this one)
3 – 1×4 Boards, 8′ Long
1 – 2×2 Board, 8′ Long
11 – 1×2 Boards (Less if you have a bunkie board or box spring), 8′ Long
1 1/4″ Screws
2″ Screws
Wood Glue
Finishing Supplies (Wood Filler, Sand Paper, Paint, Brushes, etc)
Tools:
measuring tape
square
pencil
safety glasses
hearing protection
drill
circular saw
nailer
sander
level
General Instructions:
On
a large project such as this one, it is crucial that you build straight
and square. To do this begin by working on a clean level surface.
Select boards that are straight and free of cracks or other
imperfections. Check for square after each step. Pre-drill and
countersink all of your screw holes to avoid splitting the wood and to
hide your screw heads. Use glue unless otherwise directed. Of course,
you should be safe and have fun! Remember, you can click images for
larger views.
Dimensions:
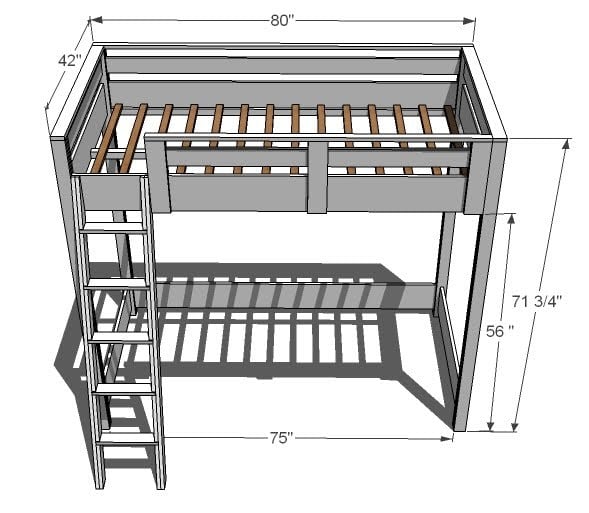
Dimensions:
Fits standard Twin Mattress. Dimensions shown in diagram.
Cut List:
Cut List for Loft Bed
8 – 1×3 @ 71″ (Inner Legs and Outer Legs)
4 – 1×8 @ 37 1/2″ (Large Planks, Ends)
2 – 1×4 @ 37 1/2″ (Top Planks)
3 – 1×8 @ 80″ (Front and Back Rails)
1 – 1×4 @ 80″ (Top Back Rail)
2 – 1×3 @ 46 1/2″ (Back Filler Piece, Long)
6 – 1×3 @ 2″ (Back Filler Piece, Short)
2 – 1×3 @ 56″ (Front Filler Pieces, Long)
2 – 1×3 @ 7 1/2″ (Front Filler Pieces, Short)
1 – 1×2 @ 80″ (Back, Top Piece)
2 – 1×3 @ 40 1/2″ (End, Top Pieces)
2 – 1×2 @ 75″ (Cleats)
1 – 2×2 @ 76 3/4″ (Center Support)
14 – 1×2 @ 39″ (Slats)
Cut List for Guard Rail
1 – 1×4 @ 61” (Rail)
1 – 1×2 @ 61” (Top)
3 – 1×4 @ 15” (Uprights)
6 – 1×4 @ 2” (Filler Pieces)
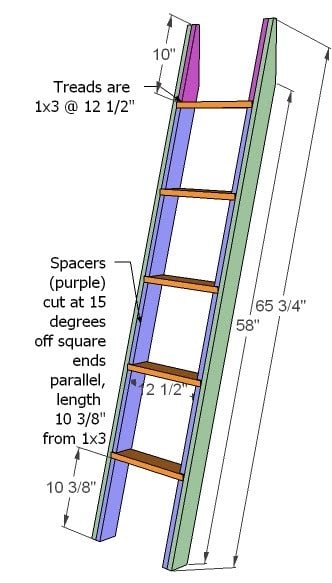
Ladder Cut List
2 – 1×3 @ 65 3/4″ Overall (Bottom end cut at 15 degrees off square, top at 75 degrees off square)
10 – 1×3 @ 10 3/8″ (Spacers, ends cut parallel at 15 degrees off square)
5 – 1×3 @ 12 1/2″ (Treads)
2 – 1×3 @ 10″ (Top Spacer, cut to match top sides)
8 – 1×3 @ 71″ (Inner Legs and Outer Legs)
4 – 1×8 @ 37 1/2″ (Large Planks, Ends)
2 – 1×4 @ 37 1/2″ (Top Planks)
3 – 1×8 @ 80″ (Front and Back Rails)
1 – 1×4 @ 80″ (Top Back Rail)
2 – 1×3 @ 46 1/2″ (Back Filler Piece, Long)
6 – 1×3 @ 2″ (Back Filler Piece, Short)
2 – 1×3 @ 56″ (Front Filler Pieces, Long)
2 – 1×3 @ 7 1/2″ (Front Filler Pieces, Short)
1 – 1×2 @ 80″ (Back, Top Piece)
2 – 1×3 @ 40 1/2″ (End, Top Pieces)
2 – 1×2 @ 75″ (Cleats)
1 – 2×2 @ 76 3/4″ (Center Support)
14 – 1×2 @ 39″ (Slats)
Cut List for Guard Rail
1 – 1×4 @ 61” (Rail)
1 – 1×2 @ 61” (Top)
3 – 1×4 @ 15” (Uprights)
6 – 1×4 @ 2” (Filler Pieces)
Ladder Cut List
2 – 1×3 @ 65 3/4″ Overall (Bottom end cut at 15 degrees off square, top at 75 degrees off square)
10 – 1×3 @ 10 3/8″ (Spacers, ends cut parallel at 15 degrees off square)
5 – 1×3 @ 12 1/2″ (Treads)
2 – 1×3 @ 10″ (Top Spacer, cut to match top sides)
Cutting Instructions:
Converting
to Full Size
This bed can easily be converted to full size. You will simply need to
add 15″ to all boards that run parallel to the ends. This includes the
planks, end top pieces and the slats. Shopping list will need to be
adjusted as well.
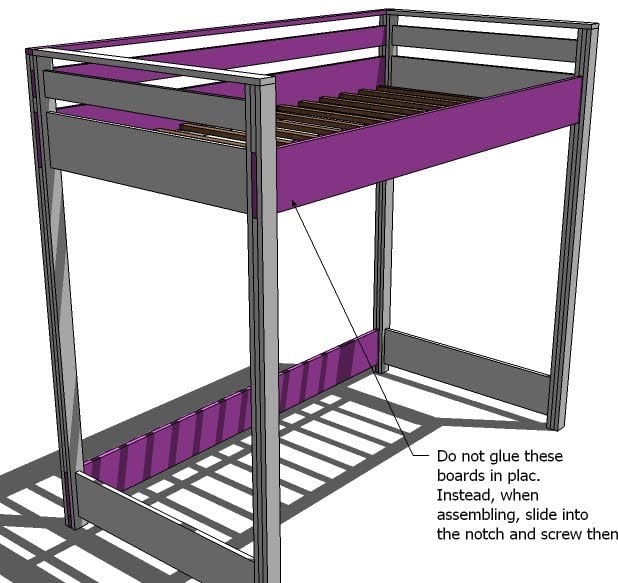
Step 1:
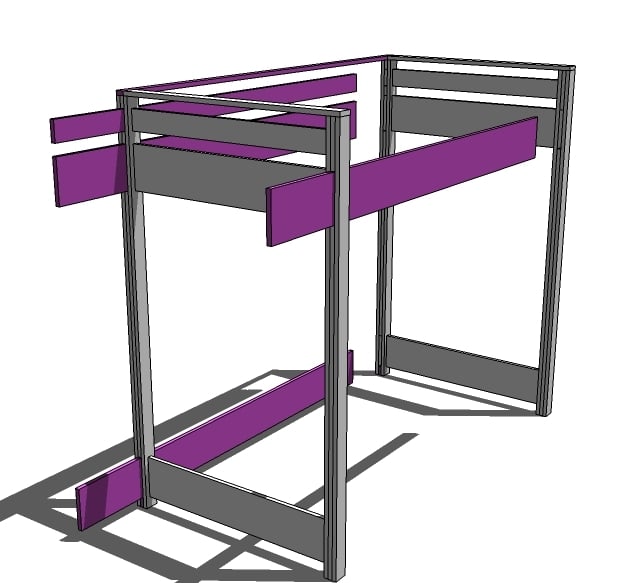
UPDATE:
If you have narrow door opening (or are building the bed in a full
size) you may need to assemble the bed in the room or not use glue so
that the bed can be assembled and disassembled. The boards shown above
in pink are not to be glued to the bed, and will be inserted in the
slots on assembly. You will then on assembly use screws to fasten the
rails to the bed ends.
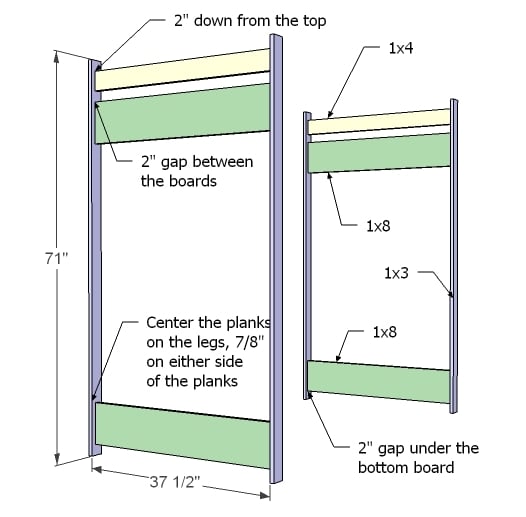


Step 2 Instructions:
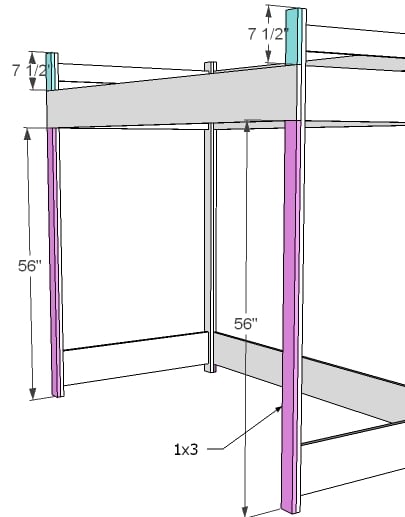
Ends
Begin building the ends by screwing with 2″ screws and glue the planks to the inside legs. Center the planks on the inside legs, leaving 7/8″ on either side of the planks. Use the measurements above to guide you. Glue these pieces.
Begin building the ends by screwing with 2″ screws and glue the planks to the inside legs. Center the planks on the inside legs, leaving 7/8″ on either side of the planks. Use the measurements above to guide you. Glue these pieces.
Step 3 Instructions:
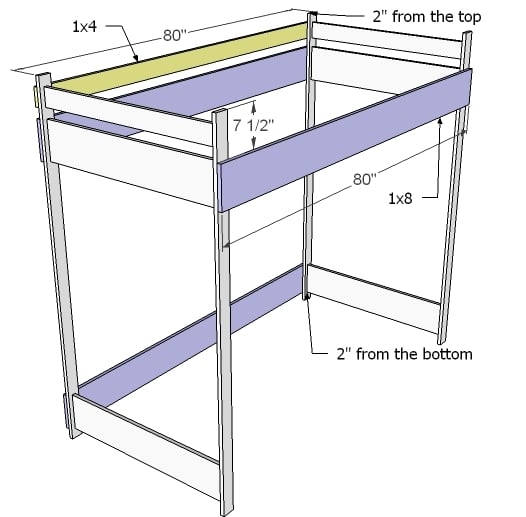
Front and Back Rails
Instead of fastening the front and back rails, mark their positions on the ends, as shown above. You can use one or two screws to fasten each board in place temporarily.
Instead of fastening the front and back rails, mark their positions on the ends, as shown above. You can use one or two screws to fasten each board in place temporarily.
Step 4 Instructions:
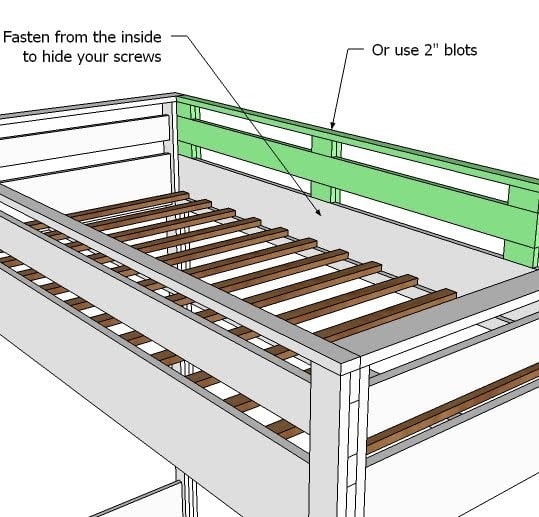
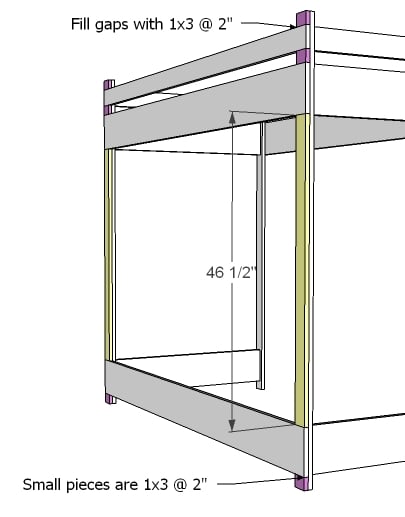
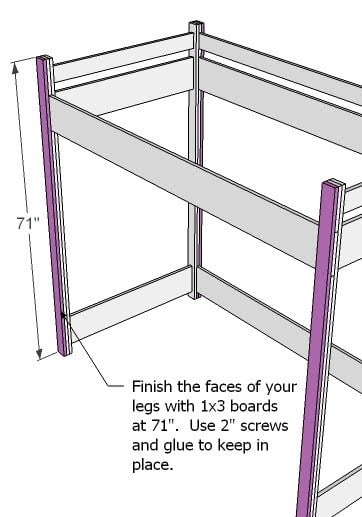
Back Filler Pieces
Measure and cut your filler pieces to fit the back as shown above. You can save yourself quite a bit of time by gluing and clamping these pieces in place. When you fasten the outer leg on, it will secure these pieces with screws. If your nailer is handy, a few 1 1/4″ nails would hold everything in place. You can use glue in this step. The filler pieces will hold your rail boards (the one’s you did not glue down in step 2) in place for now.
Measure and cut your filler pieces to fit the back as shown above. You can save yourself quite a bit of time by gluing and clamping these pieces in place. When you fasten the outer leg on, it will secure these pieces with screws. If your nailer is handy, a few 1 1/4″ nails would hold everything in place. You can use glue in this step. The filler pieces will hold your rail boards (the one’s you did not glue down in step 2) in place for now.
Step 5 Instructions:
Front Filler Pieces
Add your front filler pieces just like you did your back filler pieces. Glue and screw.
Add your front filler pieces just like you did your back filler pieces. Glue and screw.
Step 6 Instructions:
Outer Legs Pieces
First unscrew the rail boards that you loosely screwed in step 2, and remove. Then, using 2″ screws and glue, pre-drill and countersink your screws as you fasten the outer leg boards to the inner leg boards. If you are staining or leaving natural, I highly recommend using a measured bolt pattern or screwing from the inside of the legs on this step.
First unscrew the rail boards that you loosely screwed in step 2, and remove. Then, using 2″ screws and glue, pre-drill and countersink your screws as you fasten the outer leg boards to the inner leg boards. If you are staining or leaving natural, I highly recommend using a measured bolt pattern or screwing from the inside of the legs on this step.
Step 7 Instructions:
DO
NOT FASTEN in the gaps left for the rail boards. Test fit your rail
boards to make sure they fit in the opening. The diagram above shows
how the rail boards should be removable.
Step 8 Instructions:
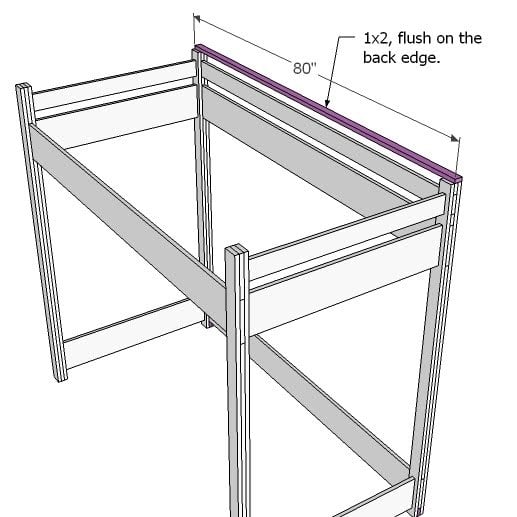
Back, Top
Using 2″ screws, fasten the back top piece to the tops of the legs. The back top piece will be flush with the outside of the legs, but not the inside. Do not use glue. This board will be removed to move the bed through a doorway.
Using 2″ screws, fasten the back top piece to the tops of the legs. The back top piece will be flush with the outside of the legs, but not the inside. Do not use glue. This board will be removed to move the bed through a doorway.
Step 9 Instructions:
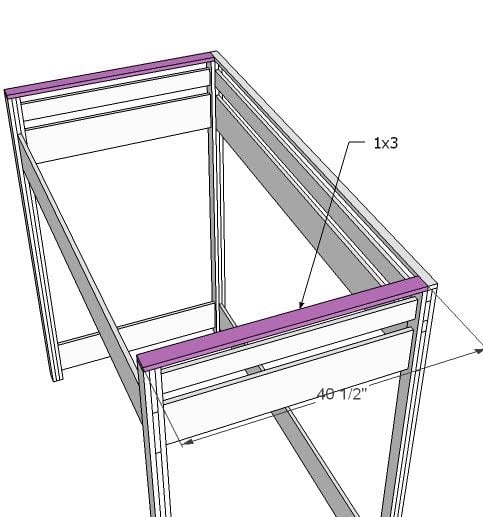
Top, Ends
Using 2″ screws and glue, fasten the top end piece to the top of the ends, as shown above.
Using 2″ screws and glue, fasten the top end piece to the top of the ends, as shown above.
Step 10 Instructions:
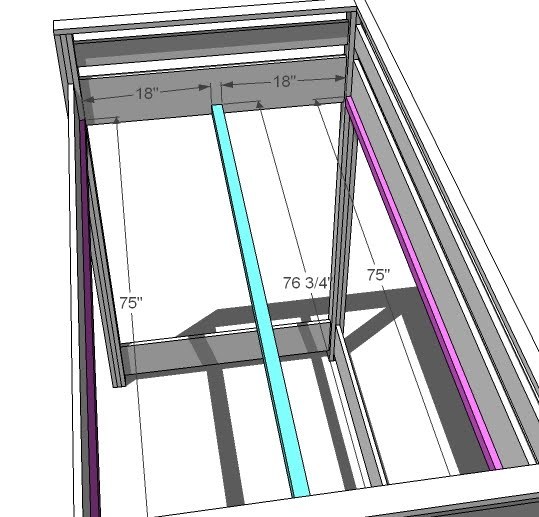
Cleats
On assembly, fasten your side cleats to the side rails, flush with the bottom edge. Use 1 1/4″ screws. Then fasten your center cleat to the end planks, flush with the bottom of the 1×8 plank, using 2″ screws and NO glue. Center the support on the plank.
On assembly, fasten your side cleats to the side rails, flush with the bottom edge. Use 1 1/4″ screws. Then fasten your center cleat to the end planks, flush with the bottom of the 1×8 plank, using 2″ screws and NO glue. Center the support on the plank.
Step 11:
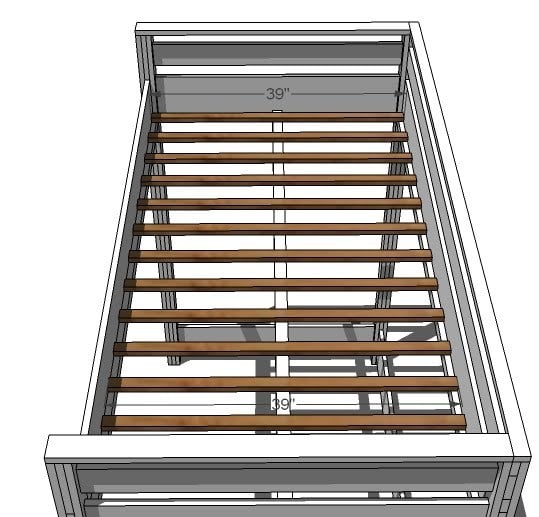
Slats
Position your slats with approximately 4″ gap between the slats. TIP: Cut 2 1×2 scraps at 4″ and uses as a spacer between the slats as you are assembling. Screw the slats down with 1 1/4″ screws. For extra support, you can also screw a couple of the center slats from the outsides of the 1×8 rails using 2″ screws.
Position your slats with approximately 4″ gap between the slats. TIP: Cut 2 1×2 scraps at 4″ and uses as a spacer between the slats as you are assembling. Screw the slats down with 1 1/4″ screws. For extra support, you can also screw a couple of the center slats from the outsides of the 1×8 rails using 2″ screws.
Step 12:
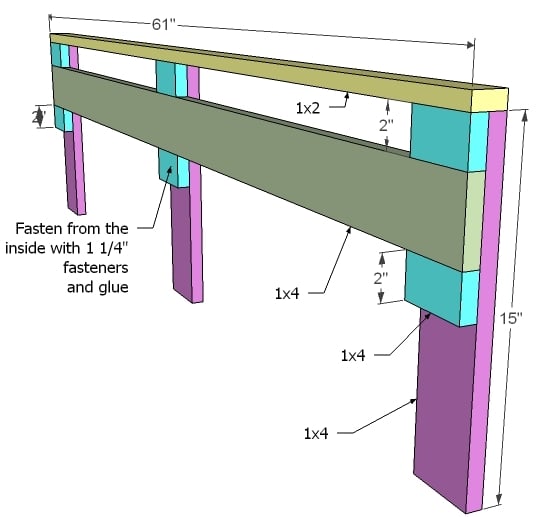
Guardrail
Use 1 1/4″ fasteners (nails would work just fine) to build your guardrail. Fasten from the inside to hide holes. Then add the 1×2 top, keeping all outside edges flush.
Use 1 1/4″ fasteners (nails would work just fine) to build your guardrail. Fasten from the inside to hide holes. Then add the 1×2 top, keeping all outside edges flush.
Step 13:
Guardrail Attachment
Attach the guardrail to the bed as shown above. From the inside, use 1 1/4″ screws. Don’t use glue so you can remove it.
Attach the guardrail to the bed as shown above. From the inside, use 1 1/4″ screws. Don’t use glue so you can remove it.
Step 14:
Ladder
So cutting the top of the sides is going to be a little tricky. Think of it this way, you are leaving a 15 degree angle on the top of the board, then trimming off the top 2 1/4″ to remove the sharp pointy end. The best way to do this is FIRST cut your top angle at 75 degrees off square (leaving 15 degrees on the board). You will need to use a jigsaw or circular saw. Then snip off the top 2 1/4″ at a right angle (90 degrees) from the back of the top (where the leg rests against the bed. THEN measure down the leg 65 3/4″ and cut your 15 degree angle on the bottom of the leg. Then use the top as a pattern when cutting the top filler pieces. Construct your ladder as shown above, using 1 1/4″ screws when joining the filler pieces to the leg sides, and 2″ screws to join the treads to the leg sides. Don’t forget your glue. See an exploded view below.
So cutting the top of the sides is going to be a little tricky. Think of it this way, you are leaving a 15 degree angle on the top of the board, then trimming off the top 2 1/4″ to remove the sharp pointy end. The best way to do this is FIRST cut your top angle at 75 degrees off square (leaving 15 degrees on the board). You will need to use a jigsaw or circular saw. Then snip off the top 2 1/4″ at a right angle (90 degrees) from the back of the top (where the leg rests against the bed. THEN measure down the leg 65 3/4″ and cut your 15 degree angle on the bottom of the leg. Then use the top as a pattern when cutting the top filler pieces. Construct your ladder as shown above, using 1 1/4″ screws when joining the filler pieces to the leg sides, and 2″ screws to join the treads to the leg sides. Don’t forget your glue. See an exploded view below.
Step 15:
Assembly
The boards shown in pink above are removable and are not glued down. You should be able to slide the boards out of the notches to disassemble the bed and move. Slide the boards back into the notches to assemble and use 2″ screws to screw from the outside of the leg into the rail boards. Also screw the back top to the top as show above. In this method, you should be able to easily assemble and disassemble the bed without destroying the finish.
The boards shown in pink above are removable and are not glued down. You should be able to slide the boards out of the notches to disassemble the bed and move. Slide the boards back into the notches to assemble and use 2″ screws to screw from the outside of the leg into the rail boards. Also screw the back top to the top as show above. In this method, you should be able to easily assemble and disassemble the bed without destroying the finish.
Project Type:
Beds
Estimated Cost:
$100-$150
Room:
Bedroom
Collections:
Loft Bed
Skill Level:
Intermediate
Style:
Children's
